Menu
|
This time last week I had just returned from FETC trying to detox from the excitement that comes from being at a conference. It doesn’t matter if it is an EdCamp, local conference, or large conference there is always something that you can ‘take away’ when you meet up with other educators and other schools. I recently came back from FETC (http://fetc.org/ ) in Orlando and everyone at my school wants to know what I learned and what we can use immediately. The thing is, for me, it isn’t always a quick process. I like to ‘sleep on’ the information I learn, process it, and reflect on it thinking about how I can use it at my school. We hear great projects and resources at conferences but I think that the best usage comes when you think about how a tool would work for your population. Ask yourself, “Is it the best tool for your population?” If you believe that technology is personal, as I do, then you know that not every amazing thing is right for every classroom. The idea that technology is personal is something I was thinking about as I was going off to FETC. I was really lucky that for FETC I was invited to the ‘Executive Summit.’ I love that on our tags it even said, “People Who Get It.” If you are ever invited, take the opportunity to meet some of the other innovative educators with great vision. The speakers were amazing during this preconference. A special shout out goes to @JenWomble for putting the session together. Here were some of my personal notes (In no particular order:)
 Vendors: There is so much anticipation for the conference floor to open. I always notice that many run to the big vendors or go booth to booth for freebies. Me? I prefer to head straight to the newbies that stand at small little tables. That’s where I try to guess where the edtech is going next. I love to ask the vendors (who are often the inventors/owners) what their inspirations are. I love to ask them tough educational questions and try to guess what a product will look like when it gets to a more polished level.
As a side note to all of the other teachers I met…Maker can be anywhere. You can start small, even in the corner of a classroom. When I started I didn’t have a room for Innovation, I had a table in the corner of a computer lab. (That’s right, I started by doing ‘centers’ in a computer lab. It is possible.) I met tons of people who were as passionate as I and are trying to figure out the combinations of Maker, STEM, STEAM, Coding, Robotics, Problem Based Learning, etc. in the elementary setting. Now you know why my brain hurts because it is a ton to process. Since we have to wait a whole year to go to another FETC, L you may want to check out theeducationcalendar.com which lists several upcoming ways to meet with other educators all over the country. If you enjoyed this post please click the vendors on the side. Thank you.
I'd love to hear what your 'take aways' were from FETC or other conferences below.
0 Comments
Safety In Elementary Making Often I get asked for recommendations on how elementary making areas can be safer. The debate between exploration/freedom and liability is tricky. However, I believe that there can be safe exploration. Elementary makers have to operate differently from middle and high school maker areas due to the ages of the students. You can find safety rulers on amazon.com I do a ton of scoring on cardboard to get students started and then have them finish off the cutting. (I learned this trick when I attended Maker Educator Bootcamp which was awesome: https://pittsburghkids.org/education/maker-educator-bootcamp ) 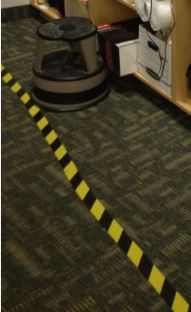 Caution tape makes it easy to define 'hot' areas. Everything is still open for students to use however they know that when something they need to use is beyond the caution tape they should ask for adult backup. Which version is safer? We try to teach the student to look for safety issues in our lab and either report them immediately or fix the issue. Hand drills...remember the ones without batteries? These are great to encourage elementary students to SLOW DOWN. Please 'click' on advertisements to show your support of this blog. Thank you.
So your students have created an actual cardboard car that moves with the assistance of a remote control. Now what? If your student creations are as large as mine have been you are left with the challenge of what do with their projects after presentation and reflection. Some we can display in the lobby of your school or take to a fair...but then what? How can we share some of our new creations with others (including parents?) I like the online format https://www.creatubbles.com/ because it also operates as a social media platform for students to comment or 'like' each others work. There are some great safety features built in and the focus in on the upload of the work, not photos of the student. I've seen comments coming in from around the world. Check out some of these projects: 2nd Grade Gliders -- https://www.creatubbles.com/galleries/Y2TOg0CT 3rd Grade Urban Planning--https://www.creatubbles.com/galleries/k2ATqVTC 4th Grade Invasive Species -- https://www.creatubbles.com/galleries/gao8anYQ 5th Grade Colonial Tools -- https://www.creatubbles.com/galleries/VFt8NE70 Shoe Design Project-- https://www.creatubbles.com/galleries/9ICOWKmj Open Innovation Lab Projects -- https://www.creatubbles.com/galleries/ScmyZxik Please share different ways you share some 'maker' creations your students have made. Please 'click' on advertisements to show your support of this blog. Thank you.
 Not all students come into my lab with a vision of what they want to create. My room has a ton of tools and it can be overwhelming the first time students come in to use the room. There are some that walk in with a drawing that they want to try and recreate but there are others that need further guidance. They either don't think about themselves as 'makers' yet or are more analytical students who I'm still working on to think 'outside the box.' The challenge is to choose centers that still push students into exploration and challenge them to 'figure it out' themselves. I tend to put out a minimum of 4 areas for students to get them started. An area can sit out for quite some time before interest is taken. Sometimes an area is popular with one group of students and not with a different set of students. Catapults encourage engineering skills and exploration if set out correctly. I do not do a step by step explanation of what they are going to look like in the end. (Although I have seen other instructors give elaborate instructions they think are needed.) I do set up recommended supplies: popsicle sticks, rubber bands, plastic spoons, along with a sheet of Google images on catapults. (I try to leave one station glueless when possible, but I do allow students to utilize glue when they feel it helps their catapult design.) My directions are as follows: Please try to create a catapult. Try to do it by yourself. Think about what doing something independently means to you. I make this announcement loudly and in front of other classroom teachers so that they can pick up on my cue (that I don't want them to make the catapults for the students when they have difficulty wrapping the rubber bands.) Overall my test has worked. Students leave explaining that they 'figured out' how to put a catapult together by themselves. I measure my own success when students return with their own visions about what they want to design using the room as their toolbox. Word of warning: Marshmellows make a mess. Stick to craft fuzz balls. When we changed my classroom from a computer lab to a design and engineering space that included technology some adults freaked out. Why? I only have my own story to tell. As a teacher lured toward elementary students, by nature, I tended to sway towards language arts and social sciences. I don't think I was alone in feeling like this. As a kid I was a solid 'C' student in science. I just didn't see how it was relevant to the world or how I could use it. Fast forward to being flexible, teaching digital media, and now Innovation. How was I supposed to explain to teachers with no frame of reference that design & engineering was part math, part science, part art and can be integrated into Language Arts and the social sciences? Hmmmm. What I found was by having the students pre-plan what they were going to create there was more reflection put into the process. Here are some of my favorites (I do love some good freebies that I don't have to create:) STEM Mini Journal (This is the one I use for JK-3) https://www.teacherspayteachers.com/Product/Free-STEM-Challenge-Mini-Journal-1807836 Design Cycle (This is the one I use for grades 3-5) https://www.teacherspayteachers.com/Product/STEM-Design-Cycle-FREE-Graphic-Organizer-970762 Independent Research Proposal https://www.teacherspayteachers.com/Product/Independent-Research-Study-Planning-Pages-Passion-Projects-Genius-Hour-1185154 Genius Hour Project Proposal: http://creativeclassroomtools.blogspot.com/2014/03/genius-hour.html Not going to lie. In the beginning there were some that would come in to the room, tell their class to grab supplies and try to sneak out. Even though some of these teachers are my good friends I stood firm and asked them (at a minimum) for five minutes to have their students create a supplies and materials list for the student creations. I did receive some grumbles from a couple adults who just wanted to rush in, rush out, get started on the project. However I keep repeating...It's the process, not the outcome that is important. My current challenge is reflection because I don't often get to see final results due to the nature of my room and time schedule. I have been invited to some classes to see presentations and hear feedback. The third graders videotaped the presentations and uploaded them for families to see at home. Some students complete the cycle forms (above) when time permits in my room however in general the reflection happens in the general classroom so that students can make use of the time they have in my room. This semester I plan on asking teachers their feedback on these design and engineering cycle forms in hopes of creating one that represents our school vision. Please 'click' on advertisements to show your support of this blog. Thank you.
When students are in my room it is loud. I don't have the hang-ups that some have about having a quiet working environment and I encourage communication and group work. On the other hand I appreciate different teaching styles and I believe that students learn from every kind of teacher. As students line up to leave my room I remind them to take a deep breath (not a funny one) and take a moment to think about where they are walking and what lesson they are doing next. By taking a moment to talk about what transitioning means to elementary students and modeling transitions my peer educators have also mentioned that this works in other settings. Students have recognized that playing a game (even a noble coding game where they are thinking deep strategy) requires detox in order to move to the next class in the day. When we are in a making environment students are encouraged to shout out ideas and no one is really sitting in the chairs that are available because they are roaming the room looking for materials for their inventions. Some of my peer educators have found success in using some of the yoga sessions on https://www.gonoodle.com/ (which are fairly short) because the students are using tech, being interactive with the Smartboard, and taking a moment to reflect on what is next in their day. Please 'click' on advertisements to show your support of this blog. Thank you.
Hand and eye coordination is key for the pre-primary grades. Teacher buy-in to the use of IPads for the younger grades goes up when you are integrating something tactile with the game play. Some of the tools available are also at a nice price point for schools and are sturdy enough to be reusable. What I love is that many of the apps are free once you purchase the device and either their are multiple apps being developed or the reverse (more tools are created.) Here are some of my favorites:  Tiggly https://www.tiggly.com/ I have the Letters, Shapes, and Numbers With the Letters I found them using a ton of blends which made them difficult for JK/K but perfect for 1st grade or our ESE program. Also, my stash only includes only vowels which is tricky if you work at a whole language school. However some teachers mentioned Shapes were too easy so we left them for the JK classes. The Numbers had the widest application and I adored the 'Tiggly Chef' game because you can use the distributive property to break apart numbers.  The Osmo device https://playosmo.com/en/?utm_source=Bing&utm_medium=CPC The way I love to explain this to new users is that we are putting a mirror on top of the camera of the IPad so that the device can read what is in front of it. 1. Tangrams-What I like about the easy levels of Tangrams is that the pieces are color coordinated and light up when the student puts it in the right spot. The app will also tell the student to move the tangram they are matching if the design will go out of the scanned area. 2. Words-My beginning readers of sight words like this because the game operates like hangman with pictures in the background. Teachers can sign up for an account to create their own word lists or make the game harder...but I honestly have not had a ton of buy in because there are multiple steps. 3. Newton-This is my administrator's favorite because there are some engineering concepts with figuring the angles to which the game balls drop. This game gets difficult quickly. I like to use a white board instead of hands to deflect the balls because sometimes the device reads the creases in my hands as interfering objects. 4. Masterpiece-This is fun. This app operates as a tracing table of sorts. Also Osmo offers a variety of contests. I've had some students use this app to draw things to include on posterboards for presentations. 5. Numbers-This is the newest tool and my personal favorite. By using the distributive property students can place combinations of numbers in front of the screen to 'release' the goldfish.  Marbotic-Smart Letters I confess that they come from France and I snagged an early set from Kickstarter but these were worth it. I want their numbers version, STAT. This was what I was looking for in terms of the JK classes. You receive every letter in the alphabet and multiple games. The JK classes decided to split the set into four groups and rotate them because to use the apps you do not need all the letters. This way the teacher can decide what letters to focus on. One of my mantras to students is a reminder of the 20/20/20 rule. For every 20 minutes, please make sure that you look up at a distance of 20 feet away. Yes, I know it isn't very techie to be preaching the putting down of a device but I don't want their brains to turn to mush. Manipulatives like the ones above help to break up the stare down that happens when looking at a screen for too long. Please 'click' on advertisements to show your support of this blog. Thank you.
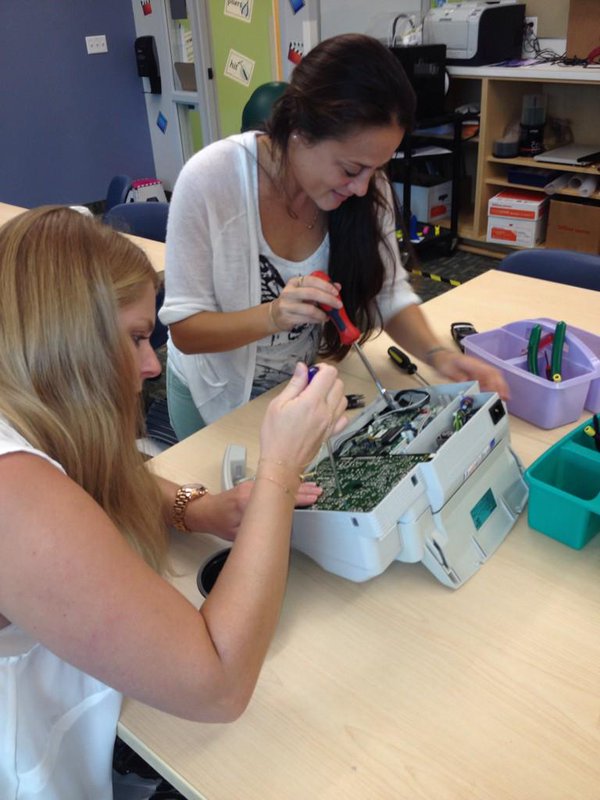
The first time I had a group of 5th graders in my room and I told them they could take apart a computer they looked like I had given them a million dollars. They were so excited. The next day they started bringing in all kinds of electronics and tools saying that their parents would not have allowed to investigate until after they had been introduced to the concept at school.
I've also worked with high schoolers that do not know how to turn a screw driver (instead they slammed it down like a hammer.) It has made me realize how important exploration is to all ages. There have also been exciting times when teachers have been introduced to drills for the first time. (That actually scares me a bit because knowing how to use a drill is an essential adult skill when living through hurricane season in South Florida.) However I believe the best part of 'Take Apart' occurs when students look at the pieces and start thinking about what they can do with the leftover pieces. We have a mantra in my classroom: Take apart is about investigation, not 'break apart.' This means that we look at how to take an item apart and try to figure out the best tool for the job. When I hear a hammer, I do some serious inquiry into why that tool was chosen because most of our take apart has multiple screws. It is finding their locations that is the tricky part because there is always one hiding. Our 'Take Apart' area only exist with the help of the community. We accept old VCRs, Tape Players, Fax Machines, computers, etc. The funniest moments are when we get a piece of equipment that the students are not familiar with. For example, explaining what a fax machine did for those of them that have not seen one before. Please let me know how you utilize 'Take Apart' areas in your school. Yes. We are obsessed with Tinkercad.com and the way we can combine mathematics and design. What about students who still do not have the skills for the site? Non-readers still may have difficulty following the instructional sections. The Cubify Draw app https://itunes.apple.com/us/app/cubify-draw/id635482654?mt=8 can lead even our youngest students into 3D printing. Some teachers choose to use the app more for a visual idea of what a 3D image would look like (avoiding an actual print altogether) and then screenshot the image to send home. Here are some ideas I've seen teacher's use the product for: -JK Width and Height Manipulation -K Letter Formation -1st Grade Geometry Shapes -2nd Grade Tool Creations -3rd Grade Cursive Writing Keepsakes -4th Grade Quick Additions to Dioramas -5th Grade Beads Integrated into Textiles for Social Studies The prints are hollow unless you fill them. That means most of the prints have taken me about 20 minutes on average to print and don't waste the filament. 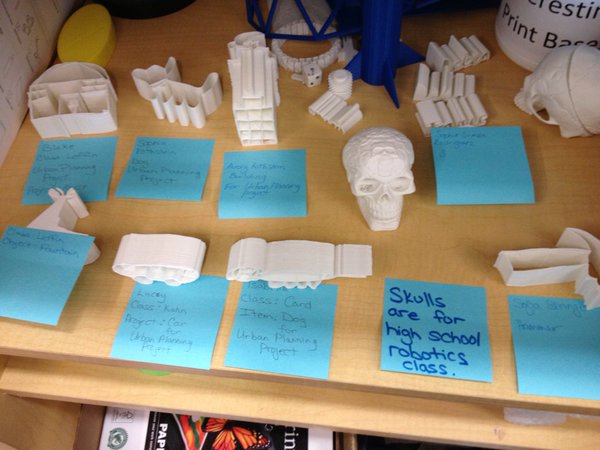 Please 'click' on advertisements to show your support of this blog. Thank you.
|
AuthorDebra Jacoby, J.D. Archives
January 2024
|
Proudly powered by Weebly












 RSS Feed